My Garden Post

Tuesday, November 26, 2013

Gardening Systems: Make the Most out of your Investment

My Garden Post costs most folks $199.99 or more. As gardening systems go, it’s about mid-range, but still an investment that can’t be made without reasonable due diligence. Gardeners are a practical lot and want to get full value out of every dollar.

The purpose of this post is to help you with your diligence. While some may be content with 3 or 4 months of vegetable gardening, I’m posting weekly suggestions on ways to keep a My Garden Post in use and productive 12 months a year. I’ve already shared my experience with growing herbs inside and the enjoyment of cooking with fresh herbs all winter long. Today I have pictures of three ways to use your MGP and individual planters after the vegetable gardening season has passed.


This arrangement of ferns, pothos and ivy grow very well indoors. The wealth of light from the glass door is actually more than the plants need, but they loved it. My Garden Post is an attractive addition to the décor of gardener’s homes.


With my vegetables all harvested, I converted two My Garden Posts to fall themes. This handsome planting of mums, kale, cabbage and grasses looked terrific for 2 months.


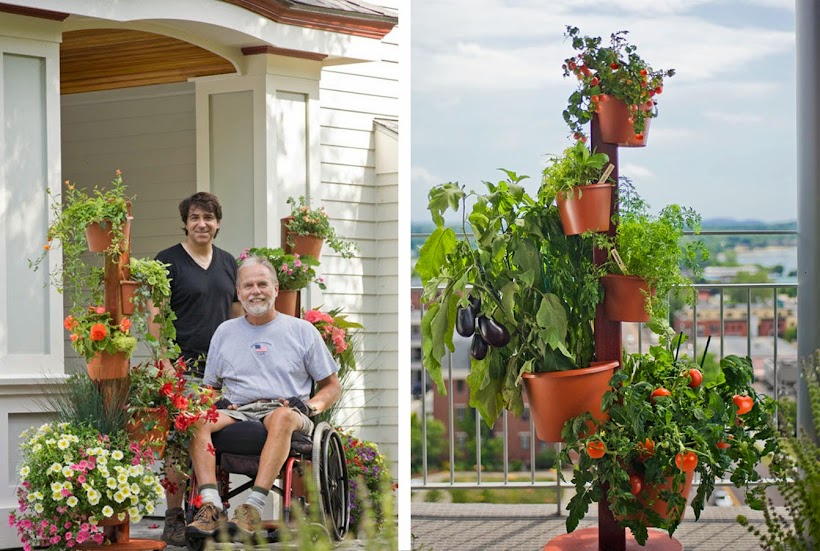
These MGP planters grew a lush display of annuals all summer. For the holidays, they make a beautiful addition to the other Christmas decorations about the house. The innovative planter design and secure mounting bracket allow you to garden vertically anywhere you have a 4” X 4” post.

Thank you for following and Happy Thanksgiving,
Oliver

Wednesday, November 20, 2013

Your Plants Have to Eat: Fertilizing Your Garden

I read the results of a national gardening survey recently and wasn’t surprised to learn that more than half of American gardeners don’t fertilize their plants. That’s a shame and a waste of time and plants. I can assure you those who do fertilize get far better results than those who don’t. For purposes of our discussion today, I assume you are growing on My Garden Post and using a good quality soilless container mix (refer to post All AboutSoil). The germinating mix and container mix I use have no nutrients added and my plants depend on me for every meal they get. I fertilize to insure healthier plants, good growth, more fruit and vegetables and more vibrant flowers. Container plants without fertilizer experience just the opposite.

I’ve used Neptune’s Harvest and Fish Rich fish fertilizers, with good results from both. These water soluble organic fertilizers can be applied when you water to feed the roots, sprayed on the leaves or both. I added fish fertilizer to the water used to irrigate the seeds I sowed on November 2nd. As the roots developed, the fertilizer was available to them.  Every Saturday I add a tablespoon of fish fertilizer to the water I irrigate with. The cucumber and tomatoes have already produced their first set of true leaves and they’re hungry. That’s my clue to begin foliar feeding. I plan to mist the plants with a fish fertilizer solution twice a week. The nutrients are immediately available to the plants when absorbed through the leaves. I tend to follow the manufacturer’s recommended rate and frequency of application.


In the paragraph above, I referred to “true leaves”. See below for an explanation of the difference between “cotyledons” and “true leaves."
“Bush Steak” Tomato Seedling on Day 15 ~ The two larger leaves with smooth edges are the cotyledons. They are the first leaves to appear in the germination process and feed off the food stored in the seeds. The small serrated leaves in the center are the first true leaves. They will depend on me for their meals.

Cucumber “Bush Champion” Day 15 ~ This compact cucumber seedling is off to a vigorous start with a pair of large healthy true leaves. The cotyledons will yellow and fall in the near future.

Thanks for following; your questions and comments are always welcome. See you next week. Oliver

Wednesday, November 13, 2013

Selecting The Best Seed

Near the end of my post last week, I shared that I have a childlike fascination with germinating seeds. This might be a good time to confess that I enjoy watching plants grow even more than eating the vegetables, herbs, flowers and fruit that I produce. I admit; it’s easier to buy the transplants, but you’ll not experience the rewards and gratification that only come by starting from seed. The seed for some of the cultivars I grow are not always available at my favorite garden center, so I often shop on line. Let’s assume I’ve convinced you to start from seed. Today’s post will offer suggestions on selecting the right varieties of seed for growing a vegetable garden on a My Garden Post.

You only have one basic restriction when you choose the vegetable seeds or transplants to grow a salad garden on My Garden Post, the mature height of the plant. Always select compact varieties and crops that naturally mature at less than 24”. Here’s a collection that has worked very well for me.

  • Bush Steak Tomato (2 plants per 1 large planter)
  • Tiny Tim Tomato (1 plant per 1 small planter)
  • Cucumber “Spacemaker”  (2 groups of 3 seedings per 1 large planter)
  • Mesculun “Salad Mix” (crowd 6 plants per 1 small planter)
  • Lettuce “Gourmet Mix” (crowd 6 plants per 1 small planter)
  • Hybrid Pepper “Sweet California” (2 plants per 1 large planter)
  • Spinach “Summer Perfection” (6 plants per 1 small planter)


I’m not loyal to any one seed company


I sowed these seeds November 2


Eight days later, the peppers and lettuce won’t be seen for a few more days.

About Watering

Watering the propagation tray pictured below is easy, but the process is very unforgiving. With bottom heat or sun, the germinating mix tends to try out in a day or two with very little warning. Seeds and seedlings require consistent moisture. The new plants are so tender it’s easy to find them wilted flat on the tray. It’s best to inspect your propagation trays every day until you determine how often they will need water added. You’ll soon learn to associate the color of the medium with the need to add water to the tray.

See explanation below.
I water from the bottom up; meaning that I lift the styrofoam insert with seedlings and pour a ½” of fertilized water in the black plastic try. Then I set the insert back in place. The germinating mix wicks the water to the surface, irrigating and feeding the new seedlings.

Next week I’ll check up on the peppers and lettuce to see if they have sprouted and make recommendations on fertilizers for our salad garden. I welcome your comments and questions. Best regards, Oliver 

Wednesday, November 6, 2013

All About Soil

For the purposes of this post, I’ve made two key assumptions. You’ll be growing a salad garden, propagating your transplants from seed and using the My Garden Post for your vertical gardening needs. I know there are many gardening enthusiasts in the frost-free states who are setting up their My Garden Post (MGP) for the first time and all are anxious to get started. At risk of offending those who have been gardening for years and know their stuff, I want to make sure you use the best growing mediums for seed propagation and the planters. Today’s post is all about the soil. You’ll need a few quarts of germinating mix and 30 quarts of container mix. Thirty quarts will fill all five planters on My Garden Post. Expect to pay $20 or less for both growing mediums.

About the Soil

Visit your favorite garden center or home store to buy growing mediums that meet the criteria listed below. Read the labels carefully. Here are the characteristics you want in your germinating mix:

  • Ph of 6.3 – 6.8
  • Mycorrhizae expand primary and secondary root development which enables the plant to take up more nutrients. Expect more flowers and fruit
  • Humic Acid to increase micro nutrient uptake
  • Ingredients
    • Peat moss
    • Horticultural perlite
    • Earthworm castings
    • Granite dust
  • I’ve always added a biological fungicide with iron and humic acid to my growing mediums as a safeguard.

The growing medium used in the planters is slightly more coarse and heavier than the germinating mix described above. Most good quality container mixes have these ingredients in common:

  • Sphagnum peat moss
  • Perlite
  • Vermiculite
  • Dolomitic limestone 
If the mycorrhizae, humic acid and worm castings are not already in the germinating mix and growing medium, they can be purchased separately and added to your mixes. A little goes a long way.

    24 Cell Propagation TrayUse a heat mat to maintain a temp. of 70 – 75 degrees F


Clear plastic domeRemove when plants develop first set of true leaves

 Propagation From Seed

Starting plants from seed is my favorite part of gardening. I’m like a child waiting for the first signs of germination. Kids think it’s magical and I can see no reason to disagree. For the benefit of the FFF, frost free followers, please see the propagation tray pictured. I have the tray on a heat mat, but with night time temperatures of 70 degrees, you won’t need bottom heat. Next week I’ll write about the seeds selected and how to water them properly. Thanks for reading. Your questions and comments are always welcome.