My Garden Post

Tuesday, December 17, 2013

My Garden Post Gets in the Holiday Spirit

I’m constantly thinking of ways to use My Garden Post throughout the year. A poinsettia display has been on my mind for several months so I thought I’d give it a try. I found a good buy on the plants and it took only 5 quarts of potting soil and 15 minutes to create this stunning arrangement. It will greet customers entering my wife’s tile store for several weeks.


Of the millions of poinsettias purchased each Christmas season, very few are grown on and enjoyed the following year. What a shame! If you’d like to save yours from the compost pile, here are a few simple tips I’ve used to keep them going.

First, it’s important to keep them watered (moist to slightly dry before the next watering), fertilized (monthly), and positioned close to a sunny window for the remainder of the winter. The flowering bracts will fail and can be trimmed off. The plants will be all green for the remainder of the winter. After the threat of frost has passed, they can be moved outside.

Before I move my poinsettias outside for the summer, I repot them into plastic pots at least 2-4” larger than those they were growing in. New soil is important and I add a few tablespoons of slow release fertilizer that will feed them for up to 3 months. I supplement the slow release granules with a water soluble fertilizer every couple weeks.

I’ll admit the poinsettias can look pretty sad when the time comes to repot them and set them outside in late May. Don’t let that concern you. I cut mine back to 6”-10” and remove all the yellowing leaves. You may have only stems left and that’s OK.

Find a good location with southern exposure and plumb them up to drip irrigation. They’ll require very little attention. Within ten days you’ll notice new leaves sprouting on all the stems. The points will flush out quickly and grow 2-3 times the size when you bought them. Give them a hard pinch every six weeks to encourage stalky full plants.

Before the first frost hits in the fall, bring your plants inside and give them all the sun you can. Now, there’s a trick to get them to reflower for Christmas. They need total 14-15 hours of uninterrupted darkness from September 21st to the end of October. That can be done easily by setting a box over each plant. Choose a schedule that’s convenient for you. Example: on at 5 PM and off at 7 AM.

Try it. It’s very rewarding and saves you a ton of $$. Enjoy your holidays and send me your comments and questions. Oliver

Wednesday, December 11, 2013

Vegetable Gardening with My Garden Post

The questions I get most often from owners of My Garden Posts pertain to choosing the best vegetables to grow. I always counter with, what vegetables do you like to eat?” Before you shop for seeds and transplants, you should have a list in mind of the vegetables you most often like to toss into salad. Then it’s a matter of choosing varieties that are compact and produce high yields. I thought it might be of interest to many, if I share a collection of my favorites.

I always have 3 to 5 MGPs growing at any one time. For the purpose of today’s post, I’ll detail my favorite vegetables and their named varieties. The lower two planters are larger (14” wide) and have lots of soil and more vertical room for the veggies to grow. I use them for the plants that need the extra room. In the bottom planter, I sew 6 to 9 cucumber seeds. If all seeds germinate and mature, some will trail over the edge of the planter and onto the base. Most seed companies offer a few compact varieties. I’ve grown Burpee’s Spacemaster and Bush Champion. The Bush Champions produce great numbers of good sized cukes earlier than other varieties and they seem to like the planters. The harvest continues right into the fall.

This is not the best picture I took this summer, but it's the best one I can find at the moment.  I remember taking one shot that featured 6 cukes ready for the picking.


Two Bush Steak tomatoes in the second large planter produce all the full sized salad tomatoes you’ll want for the summer. This compact variety grows to 24” and requires good support when it gets loaded with fruit.

This is a fine example of 2 Busch Steak Tomatoes in a large planter.  I allowed them the fruit to ripen especially for a photo shoot.


Planting my way up the post, I was very happy to get full growth and produce from peppers in the smaller 8" planter.  There is adequate vertical space for the California Wonder or a number of other varieties.  The planter does get root bound by the end of the season, but that doesn't pose a problem.

Burpee (I think) offers a package of mixed California wonder peppers.  I found that this one offered an interesting contrast.  All seemed to taste alike.
I enjoy mixed greens in my salads and have found that one small planter will produce enough greens for two salads a week with 2 harvests. You can double that with 2 small planters and a mixture of spinach, lettuce and mixed greens.

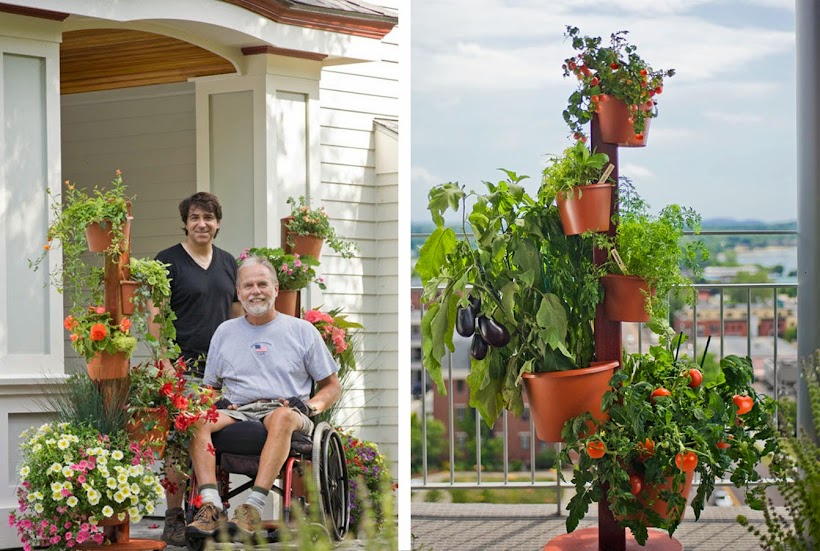
The 8” planter at the top of My Garden Post is an ideal location for 2 Tiny Tim Tomatoes. The plants can be difficult to find but the seeds can be easily ordered online. The Tiny Tim is a heavy yielder with clusters of fine flavored red fruit about ½” in diameter. It grows 10” tall and a little wider than the height. It’s very easy to grow and ideally suited for the top planter. You’ll be harvesting fruit in 45 days. They’re fun to grow and fun to eat.


"Tiny Tim" - it's hard to imagine that such a small plant can produce such a high yield
And there you have it, a salad garden that uses only 4 square feet of your balcony, deck or patio and it’s accessible to gardeners of all ages and mobility.

I look forward to your comments and questions, Oliver


Tuesday, December 3, 2013

Innovative Vertical Garden: Solving a Problem

Marc and I came up with the idea for MGP when we noticed many urban gardeners were crowded off their balconies and decks by an ever enlarging collection of plants in assorted containers. We knew up front that any new product has to solve one or more problems and customers need to find value in the solution. By going vertical, My Garden Post condenses 24 SF of containers on to just 4 SF, so we knew we could solve that problem for folks.

We continued with our due diligence and found our innovative concept solved several more problems that frustrated a few more categories of gardeners. Over the 35 years I owned and operated a retail garden center, I saw many transitions in the business. The current senior population was America’s most avid gardeners and they now are finding it difficult to garden on their knees. Most don’t want to and many simply can’t. My Garden Post is very popular with seniors, with its 5 planters within easy reach. There are no bending, stretching or dirty knees.


I gave thought to my own situation. I've been using a wheelchair for the past 25 years and have been gardening since childhood. I was gradually losing interest until the opportunity came along to test and develop the My Garden Post concept. I used a variety of prototypes during the two years of testing. Mark and I were determined to make every feature of the product easy for me to use. In doing so, we knew that we weren't just solving problems for me. There are millions of avid gardeners in wheelchairs and millions more with limited strength and mobility.  MGP has made gardening fun and easy for me again and I’m especially rewarded when customers share their same experiences.

I thought it would be fun and inspiring to share this picture of Anne, 96 years old.  She received a My Garden Post for her birthday and grew a successful garden this past summer through late fall.

I don’t want to leave you with the impression that you have to be a senior or disabled to appreciate My Garden Post. Currently, the majority of MGP owners are neither senior nor disabled. They love having the extra space on the balcony, porch or patio and the convenience of fresh vegetables, herbs, fruit and flowers just steps from the kitchen. Everyone appreciates the automated drip irrigation system. It remembers to water so they don’t have to.

That's it for this week - I look forward to your comments and questions.  O

Tuesday, November 26, 2013

Gardening Systems: Make the Most out of your Investment

My Garden Post costs most folks $199.99 or more. As gardening systems go, it’s about mid-range, but still an investment that can’t be made without reasonable due diligence. Gardeners are a practical lot and want to get full value out of every dollar.

The purpose of this post is to help you with your diligence. While some may be content with 3 or 4 months of vegetable gardening, I’m posting weekly suggestions on ways to keep a My Garden Post in use and productive 12 months a year. I’ve already shared my experience with growing herbs inside and the enjoyment of cooking with fresh herbs all winter long. Today I have pictures of three ways to use your MGP and individual planters after the vegetable gardening season has passed.


This arrangement of ferns, pothos and ivy grow very well indoors. The wealth of light from the glass door is actually more than the plants need, but they loved it. My Garden Post is an attractive addition to the décor of gardener’s homes.


With my vegetables all harvested, I converted two My Garden Posts to fall themes. This handsome planting of mums, kale, cabbage and grasses looked terrific for 2 months.


These MGP planters grew a lush display of annuals all summer. For the holidays, they make a beautiful addition to the other Christmas decorations about the house. The innovative planter design and secure mounting bracket allow you to garden vertically anywhere you have a 4” X 4” post.

Thank you for following and Happy Thanksgiving,
Oliver

Wednesday, November 20, 2013

Your Plants Have to Eat: Fertilizing Your Garden

I read the results of a national gardening survey recently and wasn’t surprised to learn that more than half of American gardeners don’t fertilize their plants. That’s a shame and a waste of time and plants. I can assure you those who do fertilize get far better results than those who don’t. For purposes of our discussion today, I assume you are growing on My Garden Post and using a good quality soilless container mix (refer to post All AboutSoil). The germinating mix and container mix I use have no nutrients added and my plants depend on me for every meal they get. I fertilize to insure healthier plants, good growth, more fruit and vegetables and more vibrant flowers. Container plants without fertilizer experience just the opposite.

I’ve used Neptune’s Harvest and Fish Rich fish fertilizers, with good results from both. These water soluble organic fertilizers can be applied when you water to feed the roots, sprayed on the leaves or both. I added fish fertilizer to the water used to irrigate the seeds I sowed on November 2nd. As the roots developed, the fertilizer was available to them.  Every Saturday I add a tablespoon of fish fertilizer to the water I irrigate with. The cucumber and tomatoes have already produced their first set of true leaves and they’re hungry. That’s my clue to begin foliar feeding. I plan to mist the plants with a fish fertilizer solution twice a week. The nutrients are immediately available to the plants when absorbed through the leaves. I tend to follow the manufacturer’s recommended rate and frequency of application.


In the paragraph above, I referred to “true leaves”. See below for an explanation of the difference between “cotyledons” and “true leaves."
“Bush Steak” Tomato Seedling on Day 15 ~ The two larger leaves with smooth edges are the cotyledons. They are the first leaves to appear in the germination process and feed off the food stored in the seeds. The small serrated leaves in the center are the first true leaves. They will depend on me for their meals.

Cucumber “Bush Champion” Day 15 ~ This compact cucumber seedling is off to a vigorous start with a pair of large healthy true leaves. The cotyledons will yellow and fall in the near future.

Thanks for following; your questions and comments are always welcome. See you next week. Oliver

Wednesday, November 13, 2013

Selecting The Best Seed

Near the end of my post last week, I shared that I have a childlike fascination with germinating seeds. This might be a good time to confess that I enjoy watching plants grow even more than eating the vegetables, herbs, flowers and fruit that I produce. I admit; it’s easier to buy the transplants, but you’ll not experience the rewards and gratification that only come by starting from seed. The seed for some of the cultivars I grow are not always available at my favorite garden center, so I often shop on line. Let’s assume I’ve convinced you to start from seed. Today’s post will offer suggestions on selecting the right varieties of seed for growing a vegetable garden on a My Garden Post.

You only have one basic restriction when you choose the vegetable seeds or transplants to grow a salad garden on My Garden Post, the mature height of the plant. Always select compact varieties and crops that naturally mature at less than 24”. Here’s a collection that has worked very well for me.

  • Bush Steak Tomato (2 plants per 1 large planter)
  • Tiny Tim Tomato (1 plant per 1 small planter)
  • Cucumber “Spacemaker”  (2 groups of 3 seedings per 1 large planter)
  • Mesculun “Salad Mix” (crowd 6 plants per 1 small planter)
  • Lettuce “Gourmet Mix” (crowd 6 plants per 1 small planter)
  • Hybrid Pepper “Sweet California” (2 plants per 1 large planter)
  • Spinach “Summer Perfection” (6 plants per 1 small planter)


I’m not loyal to any one seed company


I sowed these seeds November 2


Eight days later, the peppers and lettuce won’t be seen for a few more days.

About Watering

Watering the propagation tray pictured below is easy, but the process is very unforgiving. With bottom heat or sun, the germinating mix tends to try out in a day or two with very little warning. Seeds and seedlings require consistent moisture. The new plants are so tender it’s easy to find them wilted flat on the tray. It’s best to inspect your propagation trays every day until you determine how often they will need water added. You’ll soon learn to associate the color of the medium with the need to add water to the tray.

See explanation below.
I water from the bottom up; meaning that I lift the styrofoam insert with seedlings and pour a ½” of fertilized water in the black plastic try. Then I set the insert back in place. The germinating mix wicks the water to the surface, irrigating and feeding the new seedlings.

Next week I’ll check up on the peppers and lettuce to see if they have sprouted and make recommendations on fertilizers for our salad garden. I welcome your comments and questions. Best regards, Oliver 

Wednesday, November 6, 2013

All About Soil

For the purposes of this post, I’ve made two key assumptions. You’ll be growing a salad garden, propagating your transplants from seed and using the My Garden Post for your vertical gardening needs. I know there are many gardening enthusiasts in the frost-free states who are setting up their My Garden Post (MGP) for the first time and all are anxious to get started. At risk of offending those who have been gardening for years and know their stuff, I want to make sure you use the best growing mediums for seed propagation and the planters. Today’s post is all about the soil. You’ll need a few quarts of germinating mix and 30 quarts of container mix. Thirty quarts will fill all five planters on My Garden Post. Expect to pay $20 or less for both growing mediums.

About the Soil

Visit your favorite garden center or home store to buy growing mediums that meet the criteria listed below. Read the labels carefully. Here are the characteristics you want in your germinating mix:

  • Ph of 6.3 – 6.8
  • Mycorrhizae expand primary and secondary root development which enables the plant to take up more nutrients. Expect more flowers and fruit
  • Humic Acid to increase micro nutrient uptake
  • Ingredients
    • Peat moss
    • Horticultural perlite
    • Earthworm castings
    • Granite dust
  • I’ve always added a biological fungicide with iron and humic acid to my growing mediums as a safeguard.

The growing medium used in the planters is slightly more coarse and heavier than the germinating mix described above. Most good quality container mixes have these ingredients in common:

  • Sphagnum peat moss
  • Perlite
  • Vermiculite
  • Dolomitic limestone 
If the mycorrhizae, humic acid and worm castings are not already in the germinating mix and growing medium, they can be purchased separately and added to your mixes. A little goes a long way.

    24 Cell Propagation TrayUse a heat mat to maintain a temp. of 70 – 75 degrees F


Clear plastic domeRemove when plants develop first set of true leaves

 Propagation From Seed

Starting plants from seed is my favorite part of gardening. I’m like a child waiting for the first signs of germination. Kids think it’s magical and I can see no reason to disagree. For the benefit of the FFF, frost free followers, please see the propagation tray pictured. I have the tray on a heat mat, but with night time temperatures of 70 degrees, you won’t need bottom heat. Next week I’ll write about the seeds selected and how to water them properly. Thanks for reading. Your questions and comments are always welcome.

Wednesday, October 30, 2013

Transitioning Your Garden Indoors

Container gardeners in the northern states have called it quits for the year. Today I’m writing to encourage My Garden Post gardeners to make the transition to indoor gardening and to share a few tips on keeping your MGP producing through the winter. Gardeners in the frost-free states are just planting this month; I want southern gardeners to get started the right way. Next week I’ll make suggestions on the best soil, fertilizer and crop selection for My Garden Post.

I’ve grown a variety of herbs on MGP for the past two winters with ease and good results. I’m fortunate to have two large south facing floor to ceiling windows in my home office. I spend a great deal of time in this room and enjoy the company and fragrance of my plants. I bought the seven herbs in May and have grown them outside all summer. It’s forecast to be in the 20s tonight; I assume they’re happy to be inside.
Thyme, oregano, lavender, rosemary, sage and
basil happy outside.

Herbs happy to be inside

Before you roll your My Garden Post of fresh herbs inside for the winter, there are a few things to do to make the transition successful. This is how I did it:

ü  I took one last harvest and cut them back aggressively to 5-6 inches. This gave me a chance to look each planter over carefully for insects. Most herbs don’t seem to have problems with the common pests like aphids and whiteflies. Mine were pest free.
ü  I mixed a strong batch of fish emulsion (“Fish Rich” my favorite) in a 2 gallon watering can.  With the drain holes still open, each planter was drenched and allowed to drain until the dripping stopped. Inside, I’ll fertilize every 10-14 days.
o   A side note, “Fish Rich” doesn’t have any objectionable odor. It’s great for growing organic crops inside.
ü  It took me a while to remember where I had put the plugs for the planters back in May. The take-away here is to have a designated place for all your MGP accessories. The plugs for the drain holes fit snugly and they have to be in order to do their job.
o   Take special note of this next bit of advice. As a group, herbs enjoy a consistently moist soil but care has to be taken not to overwater them. Check for watering every day or two for the first couple weeks. You’ll soon develop a schedule.  I seem to be watering every 4th or 5th day.

Join me next week; my post will feature the basics:
  • Choosing the best growing medium
  • Fertilizer for organic crops
  • Watering
  • Exposure

Sunday, October 20, 2013

Welcome to the My Garden Post Blog

My first post to My Garden Post (MGP) blog is intended to make introductions and give readers a brief background on the development of My Garden Post. Beyond that I want to share the intended purpose of the blog and what readers can expect to gain from reading the weekly posts. I’m Oliver Gardner and no, my name is not my only qualification for writing on the topic of gardening. I recently retired from nearly 40 years in the horticulture industry. Thirty of those years I owned and operated Four Seasons Garden Center, Vermont’s largest gardening resource. I find I now have the time to write and still have a strong interest in sharing what I learned along the way. That’s what gardeners do, right? They like to swap stories about their successes and failures and generously share their harvest.

I also want you to know about Marc Llona. He’s the owner of My Garden Post and pictured standing in the above image. I’m the more handsome guy in the wheelchair. OK, older maybe. Marc is a successful entrepreneur with a wonderful family and too many friends to count. He is totally committed to his customer’s satisfaction with gardening on My Garden Post. I respect him for his boundless ambition, his ethics in business and his dedication to quality.

I have Marc to thank for my involvement with My Garden Post. We are longtime acquaintances and both of us happened to be headed into Home Depot one spring day in 2011. I’d known Marc for his development of the Vermont Post Planters and his success in selling them to gardeners across the country. In the parking lot, he excitedly talked of a new application for his award winning planters and asked if we could meet to see what I thought of it. I agreed and we got together a few days later.  Early into his presentation, I recognized the great potential for the concept of what we now offer as My Garden Post. I agreed to collaborate with Marc on the research and development of the product and was anxious to get started. We had several prototypes built and planted in no time. Two years of testing gave us confidence to single out one prototype for a CAD drawing and the order was placed for samples we could test. The samples outperformed my expectations. In late April of this year, the first two containers of My Garden Posts, MGP Planters and MGP Drip Irrigation Systems arrived in our Vermont warehouse and we launched our online store at www.mygardenpost.com.

My Garden Post Vertical Garden System


Who may be interested in the My Garden Post blog?
  •  I’ll be writing on topics of interest to intermediate gardeners. Having said that, I hope first time and lifetime gardeners will also participate.
  •  Urban gardeners with only a balcony, deck or patio who want to grow more with less space
  • Aging gardeners like me who no longer want to kneel, bend or stretch
  • Cooking enthusiasts who want to grow and eat their own fresh vegetables and herbs
  • Gardeners who want to reduce the carbon footprint of their herbs, vegetables, flowers and fruit
  • Gardeners who get real enjoyment out of just watching plants grow. (I’m first in this category)


My Garden Post has a great story to tell. It’s a truly unique way to garden with features that will potentially benefit millions. I’d like folks to know about it. There’s no product like it and no easier way to grow a garden on just 4 square feet. The blog is here to help you garden more productively with less work and to share your creative experiences while growing year round on My Garden Post.